This was the view from my front deck at 5:00 am this morning ... heavy cloud cover ... tide receding ... still water ... what a peaceful way to begin the day. I also wanted to share with you how light it is that time of the morning, even in very cloudy weather.
Next thing to share ... the QBee's first "Sew to Go" project that we did to prepare for our trip to "Quilt Minnesota"!
This was the inspiration for the project ... I received it as a gift a few years back from QBee Dena. She and I are Co-Presidents of the Alaska Chapter of the Terry Atkinson Fan Club! ;-) It is a long story ... the important thing is that it provides the two of us with hours of entertainment that only we find funny!
As you can see ... I have used it a lot! See the coffee stains and the notes I made while planning last summer's "QBee and Me Minnesota Shop Hop"? You can begin reading about that adventure here. The point is that I take it with me when I travel, and it has proven to be very useful. It holds a 5 x 8" notebook and easily fits into an average sized purse. I made a few modifications ... here goes ...
Begin by cutting the following:
- Front fabric cut 12.5 x 9" rectangle
- Lining fabric cut 12.5 x 9" rectangle
- First pocket fabric cut 12.5 x 9" rectangle
- Second pocket fabric cut 12.5 x 6" rectangle
- Timtex cut two 5 x 7.5" rectangles
- Batting cut larger than 12.5 x 9" rectangle
- Label fabric cut 3 x 4.5" rectangle
- Label Timtex cut 2.5 x 4" rectangle
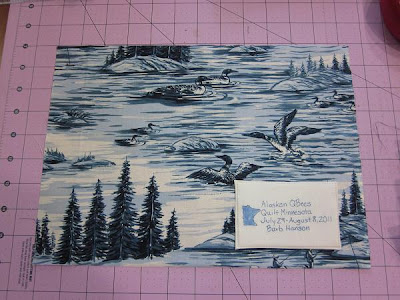
If you want to put a label on the front of your cover or embellish it in anyway, now is the time. I just took a silhouette of the state of Minnesota ... stained it with crayons to match the color of the cover and hand wrote the information with a permanent pen ... lined it with the timtex and topstitched it in place.
On the back side of your lining fabric place the timtex rectangles 1/2 inch from the outer edges ... sew in place as pictured.
To create the pockets, take each fabric rectangle and fold in half lengthwise ... press a permanent crease on the fold. Layer them as shown ... pin ... and baste in place 1/8 inch from the outer edge.
Place batting on cutting mat ... put front fabric on top right-side up ... fold back corners and trim batting.
Place lining right-side down on top of front fabric. Pin in place leaving a generous opening at the bottom. Sew around rectangle using a 1/4 inch seam allowance.
Trim batting to the stitching line and turn right side out. Tuck in seam allowance of opening ... top stitch around the entire rectangle.
I used painter's tape to mark the center sewing line. Stitch down the center beginning at the bottom to secure the pockets in place, and continue to the top. This stitching line acts like a binding in a book.
Add the notebook ... fold in half ... and you're ready to "GO"!
Here is the original ... and the two I made Sunday morning while testing my modifications ...
...yep ... I was happy with the way they turned out!
This is the one Terry B made ... love the bird theme ... so happy ... I always love how a person's fabric choices reflect them! Too fun!
QBee Lila had to leave town Sunday for a business trip so she came by with her fabric, and I made it for her ... again, the fabric matches the QBee! Love it!
I'm already planning the next "Sew to Go" project ... team building ... it's the dillydally way! ;-)
Here's the view at 10:00 pm tonight ... still heavy cloud cover ... but plenty of light! I love the extra light this time of the year ... more light to dillydally by! Have a wonderful weekend ... and ... do dillydally!


How interesting.
ReplyDelete